Pages

Wednesday, December 11, 2019

Do You Want to Build A Snowman?

Snowman Season stamp set is SNOW much fun..lol!  I just wanted to share a last minute card I was making for friends and family and here it is using the Perfectly Plaid paper by Stampin'Up®.  The Snowman punch made this a cinch to make and I used left over pieces of patterned paper for the sentiment strip "Believe" at the bottom.  I was so surprised at how quickly this card pulled together.  I did one big white circle and green one just an 1/8"bigger and just cut them in half so that they would do two cards and it worked out great.  Easy peezy, lemon, squeezy.


Thanks for joining me today, Lisa McDonough, Independent Stampin'Up® Demonstrator.  Do you live in Canada?  I do and would love to touch base with you.  You can contact me by email and even shop with me.  Have an awesome day and Merry Christmas!


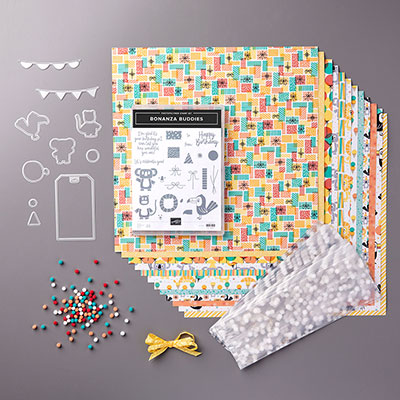
Sneak Peek Of 2020 mini Catalog - Bonanza Buddies Bundle from Stampin'Up®

Stampin'Up® has come out with the cutest bundle in "Bonanza Buddies Stamp set".  It is for kids and adults alike....after all there is a kid in all of us.  With this card, I wanted to make something that even the beginner in us can create.   I absolutely love Bonanza DSP and used the die cuts to cut out the little critters right out of paper and Voila....right to the card itself....a party in the making.

Materials Needed: 
NEW Bonanza Buddies Bundle, NEW Stitched So Sweetly Dies, NEW Painted Labels Dies, Layered Leaves Embossing Folder, Polka Dot Tulle Ribbon, Poppy Parade Ink Pad, Whisper White card stock, Granny Apple Green card stock


The NEW items will be released on January 3, 2020 and will be available to purchase through my online store.  These projects are to wet your appetite for things to come.

Step 1.  Cut Whisper White card stock to A2 size or 5 1/2" by 8 1/2".  Cut a smaller Whisper White to 4" by 5 1/4" this will be the extra layer on top of your base that will be embossed in the Layered Leaves Embossing Folder and glued on top.  I use Tombow Multi Glue® sold by Stampin'Up®.  Just a small thin line around the outside edge is enough.

Step 2. Use the Tag Die and cut the tag out of the Granny Apple Green card stock.  

Step 3.  Using the 4th largest rectangle scalloped die of the Stitched So Sweetly Dies, cut the yellow stripped rectangle out using a Big Shot or machine of choice. 

Step 4.   In the Painted Label Die set, use the smallest fancy rectangle die cut one shape out of Whisper White card stock....your sentiment will go on here.  Stamp it in Poppy Parade Ink.

Step 5. Using the Bird die and the Koala die, cut the critters out of the DSP (matching paper).  I used a Big Shot.  Then fussy cut out the balloons and the lion, and gifts out of the paper as well.    Please note....for the Bird, I cut down the middle black line of his beak and slipped the balloon string in between as if he was holding it.


Step 6.  Using Tombow Multi glue® glue the critters in place.  I put the Koala behind the tag, the lion in between the layer of the yellow stripe paper and the green tag and the bird on top with the presents under and around him.  Finish off with the White Tulle ribbon.

BIRTHDAY BONANZA SUITE BUNDLE

Thanks for joining me, Lisa McDonough, Independent Stampin'Up Demonstrator.  If you live in Canada and would like to Shop with me or would like more information please connect with me.

Sunday, December 1, 2019

End of Year Sale

Stampin'Up® is doing it again and having a fabulous end of year sale, while supplies last.  You do not want to miss out.  This would be the time to get that item you have your eye on or to get that gift for Christmas and let Stampin'Up® deliver it right to your front door if you live in Canada.  Just follow this link https://lisamcdonough.stampinup.net/
or click on the Shop button above.  

The fun begins December 3rd, 2019 and runs to the end of the month.  Enjoy everyone.  Lisa McDonough, Independent Stampin'Up® Demonstrator, Canada.


Monday, November 11, 2019

Kylies Demonstrator Blog Hop November 2019 Fun Scrappy Plaid Squares

Thank you for joining us for our Stampin' Up!® Demonstrator Monthly Team Blog Hop! We are so happy that you could join us today for this blog hop for ideas and creative inspiration. We are a group of Stampin' Up!® Demonstrators from around the world that are taking part in training that is helping us to build a successful Stampin' Up!® business and reach some goals we have set. 

We really appreciate your support. You may be starting here or have come from another blog - either way you can find the link list at the bottom of this post so that you can see every blog post and idea today. 

 If you are anything like me, you have a lot of scrap pieces hanging out somewhere in your craft room. When it is our gorgeous Stampin'Up® Wrapped in Plaid Designer series paper you will want to save those 1 1/2" pieces for this next card. It makes a very simple but stunning masculine card for Christmas.      
Live in Canada....Shop with Me...Lisa McDonough.

Materials:  Night of Navy Card stock, Copper Foil Sheets, Wrapped In Plaid Paper, Whisper White Card stock, Tranquil Tide Ribbon (in clearance....yippee)

Stamp set:  Itty Bitty Christmas

1.  Cut the Night of Navy to A2 size with fold on left side and opening on the right hand side.  I had left over squares of Wrapped in Plaid paper that I trimmed down to 1 1/2" (don't forget the paper is double sided for more alternatives).  I cut the Copper Foil to 3 1/4 by 4 3/4".   The Shaded Spruce Under layer or (Tranquil Tide if you have it) is 3 5/16 by 4 7/8"  (it is just a hair bigger than the Copper foil).

2.  Lay out your Wrapped in Plaid squares and line them up before you glue them on....it is so much easier this way.  I used the Tombow Mono Multipurpose Glue® as it gives a little wiggle room before it dries.

3. Glue the Copper Foil to the Shaded Spruce under layer.   Taking a length of ribbon wrap it around the bottom of your 3 layers and tie into a simple knot.

4.  Stamp a sentiment from the "Itty Bitty Christmas" set from Stampin'Up® and using a glue dot attach it underneath the simple ribbon knot to hold in place.

5.  Now you can glue this finished piece onto the front of your A2 Night of Navy Card and you are finished.   Applause!!!!!!

Thank you so much for coming by today! We have an amazing line up of Stampin' Up!® demonstrators from around the world, and we know you are going to love all the amazing projects that you are going to see today. Don't miss one blog link. Remember you are currently on my page - Lisa McDonough, see who is below me to know where to go next.

Blog Hop List

Tuesday, November 5, 2019

"Wildly Happy" for this Stampin'Up® Set

I am always in need of a baby shower card or a card for a wee one and the Wildly Happy stamp set from Stampin'Up® is simply adorable.  Do not let the animal images intimate you because you do not need to watercolor them in or do anything fancy at all.  I did simple stamping and came out with beautiful cards to give.  The secret..... Stampin'Up® Artisan Textures background stamp and Petal Label Dies to create a delicate frame.

Ink:  Melon Mambo, Coastal Cabana, Soft Suede, Memento Black

Whisper White Cardstock

1.   Cut a standard A4 card and a piece to fit the top measuring 4 1/4 by 5 1/2 all in Whisper White cardstock.

2.  Using the largest die in the Petal Label die, center it on the cardstock top piece and run through your Big Shot or machine of choice.  I used a piece of tulle ribbon and tied it around the edge of the card before I glued it down with Multipurpose Tombow® liquid glue from Stampin'Up®.

3.  Using the largest solid texture stamp from "Artisan Textures" I loaded the stamp with ink but stamped off once on scrap paper BEFORE stamping on my card to give a softer look. Then I stamped the foxes in Memento Black ink on top.  (You may want to play with the shape of the texture stamp and the alignment of the fox stamp to see what way works best for you.  I did this on scrap paper before I stamped on my project.)

4.  Stamp a sentiment of choice in the inside.

Thank you so much for joining me today and checking out my blog.  I live in Canada and if you do not have a Stampin'Up® Demonstrator I would love to be yours...Lisa McDonough.  I would love it if you got in touch with me.


Product List

Links by TheseAreMyStamps.com

Friday, November 1, 2019

Playful Penguins are a Delight to "Play With"

I just couldn't wait until my parcel came with my Stampin' Up® Playful Penguins.  They are so much fun to dress-up in their little bow ties, hats, and scarves.  One tip that I can give you that I noticed when working with this set, because it is a distinktive® rubber with so much texture....pause a moment or two on your paper while stamping before you pick up your image so that all those details can lay down nicely.   

The colors I used are:   Smoky Slate, Night of Navy, Merry Merlot, Mossy Meadow, and Coastal Cabana.

Card Stock:  Whisper white, Smoky Slate, Black

1.  Cut the Whisper White at 3 3/4 by 5'' and the Black by 4 by 5 1/4".  The Smoky Slate is standard A4 with the fold at the top and opening at the bottom.

2.  You will need the penguin who is looking to the left and stamp him on a POST IT note for a mask.   You will need to stamp high on the post it note, so that the head of the penguin has the tacky stuff underneath it when you fussy cut him out with scissors.  (He will have to stick nicely to the paper ;0)

3.  I lived a bit on the wild side and estimated how much distance I would need between my birds. ( It was about an inch or less from each side.) 
With this kind of detailed stamp, gently tap, tap your penguin into the Smoky Slate and stamp on the left and then reload and stamp on the right side.  Yeah!!  You have stamped 2 penguins. 

4.  Remember those post it notes, now we need them.    Yeah!!!!  Put them over your images you just stamped....lining up as much as possible.   I put a little bit of washi tape on the feet.  I did not want anything to move on me while stamping.   
Then I got the penguin out that has his arms out and put him on my block and gently loaded him with color and stamped right on top of my post it notes which are protecting my previous work.  I left my stamp on the paper for just a second to let the ink set in.   I lifted him up, waited a second for everything to dry and lifted up my post it masks.  You should have 1 penguin with his arms behind the other two.    Applause!!!!

5.  For the shadows under their feet.  I used the Coastal Cabana and stamped it off once on scrap paper and then stamped the shadow under my penguins for a lighter shade.  It gives a hint of color and brightness.

6.  The bows are done in Night of Navy, Mossy Meadow, and Merry Merlot.  If you look close, my Merry Merlot is upside down....ooops....lol

7.   My new favorite set for sentiments is Itty Bitty Christmas.   That is where the "Happy Holidays" is from and there are so many more fabulous ones from Stampin'Up®

Thanks for joining in with me.  If you don't have a demonstrator or would like to learn more about our product please contact me...Lisa McDonough

If you would like to join my classes in my home I have them once a month.


Product List

Links by TheseAreMyStamps.com

Monday, October 14, 2019

Kylie's Demonstrator Blog Hop October 2019 Colorful Seasons

Thank you for joining us for our Stampin' Up!® Demonstrator Monthly Team Blog Hop! We are so happy that you could join us today for this blog hop for ideas and creative inspiration. We are a group of Stampin' Up!® Demonstrators from around the world that are taking part in training that is helping us to build a successful Stampin' Up!® business and reach some goals we have set. We really appreciate your support.

You may be starting here or have come from another blog - either way you can find the link list at the bottom of this post so that you can see every blog post and idea today.

Here is the project that I have made for our hop today.

The Colorful Seasons stamp set from Stampin' Up!® is one of my all time favorites.  It is quite versatile and easy to use.  For my card I was inspired with all the lovely fall colors.  I used Daffodil Delight, Granny Apple Green, and Coastal Cabana Ink Pads from the Brights Collection Stampin' Up!®.  These three colors are stunning together when you use them with the Stampin' Up!® watercolor paper. 

I first used the embossing buddy on the surface of the watercolor paper to remove any oil from my hands due to handling, then stamped the leaf image with the Versamark Ink.  I then poured CLEAR Stampin' emboss powder over this and heat set with a heat tool.

Second, I pre-wet the area with an aqua painter that I wanted to watercolor.  The area that you want to keep white....keep it dry and the watercolor will not travel there.  Working from top to bottom and a bit quickly, start with Daffodil Delight, then add Granny Apple Green, then add Coastal Cabana.  (I usually will dab the ink pad to a plate and add water to the consistency I want or a drop of  Stampin' Up!® re-inkers and water.)  I then just flicked my aqua painter gently with the leftover color still on it for the splatter effect.

I am a Demonstrator in Canada and I would love it if you lived in my area if you came to one of my classes or shopped with me.  


For fun, I made a Christmas version with Stampin' Up!® Christmas Gleaming and Merry Merlot, Soft Suede, and Mossy Meadow ink pads.  Just a little note....red tones do turn to a muddy grey color when mixed with a green so this is why I used the Soft Suede in between to keep them happy.

Thank you so much for coming by today! We have an amazing line up of Stampin' Up!® demonstrators from around the world, and we know you are going to love all the amazing projects that you are going to see today. Don't miss one blog link. Remember you are currently on my page - Lisa McDonough, see who is below me to know where to go next.

BLOG HOP LIST

Sunday, October 6, 2019

The Simple Joy A Card Can Bring.

NOTHING PUTS A SMILE ON YOUR FACE LIKE A PIECE OF PAPER FOLDED IN HALF!
I was that odd person that walked around with a handmade card in her purse because you never knew when you would need it.   I can't tell you how many cards I have handed out over the years.  Or how many cards I have made for various Women's groups. Lets just say....lots and lots.
One thing I do know, is that each card brings joy to the person who receives it and reminds them that they are thought of and appreciated. Getting a HANDMADE card makes it EXTRA special.
"Creative Cards 4 You" was born because I wanted to share that gifting experience with you. I wanted to let you in, on feeling the joy of putting a smile on someone face by simply giving them - "A PIECE OF PAPER FOLDED IN HALF".  
I look forward to sharing my tips and tricks and ah..ha moments with you.